2011年6月7日火曜日

Evernoteにアクセスする その7 ユーザ情報編


さてNotebookの内容に入って行こうと思ってたんですけど、
冷静に考えるとユーザ名がない事に気づいた。
ログアウトとかに表示したいですよね。

なのでユーザの情報を取得しようと思います。

THttpClient userStoreTrans;
try {
userStoreTrans = new THttpClient(USER_URL);
} catch (TTransportException e) {
throw new RuntimeException("クライアントアクセス時の例外",e);
} catch (NullPointerException e) {
throw new RuntimeException("クライアントアクセス時の例外",e);
}

TBinaryProtocol userStoreProt = new TBinaryProtocol(userStoreTrans);
UserStore.Client userStore = new UserStore.Client(userStoreProt, userStoreProt);

User user = userStore.getUser(getAccessToken());


こんな感じです。UserStoreを取得するための
USER_URLには「https://sandbox.evernote.com/edam/user」ですね。
ノートの場合とアクセスするUrlが違います。

getUser()に対してアクセストークンを渡してあげます。
これで返って来るUserに情報が入っています。

getEmail()とかあるので「やべー」と思いましたがどうやら値は入ってないようですね。
Userを見る限り、UploadのLimit等も入っているのでその辺りを考慮してアップロード等を
行う必要があるようですが、一応アップ系の処理は行わないので使わないかな?

さてまた寄り道になりましたがひとまずそれを利用してログアウトのリンクを作成。
ノートブックの一覧等を利用して、ひとまずノートを選択するような仕組みにしてみました。

ここからアクセスできますけど、
sandboxのユーザがないと無理ですので、持っている方しかアクセスできません。

2011年6月6日月曜日

Evernoteにアクセスする その6 ノート一覧取得編


さて認証部分も終わったので、そろそろAPIでアクセスしないと
何やってるかわかんなくなってくるのでひとまずアクセスしてみよう!

実際にそこまでEvernote使いこなしているのか?という事も疑問でしたが
「メモ(ノート)を取る」という意味ではすごく良いアプリなんだな。。。と感じてました。

で、メモを活用するというアプリを考えた時に
「んじゃEvernote使えば?」というのが、このAPIにアクセスするきっかけになったわけです。

で、、、当初メモを取るアプリを考えていたんですけど、逆に考える事にしました。
メモはいくらでも、どんな媒体でも取るんだから、メモに情報を付加したり、
メモを取った後に色々眺める機能を作ってみようって。
まぁAPIアクセスを考えれるように、少しは追加とかもやるかもですけど。


で、evernoteにAPIでアクセスするまで、「ノートブック」と「ノート」の概念をあまり考えていませんでした。
なのでまずは一覧化して表示してみましょう。


NoteStore.Client noteStore = getClient();
List notebooks = noteStore.listNotebooks(getAccessToken());

for (Notebook notebook : notebooks) {
String guid = notebook.getGuid();
logger.info(notebook.getName() + ":" + guid);
NoteFilter filter = new NoteFilter();
filter.setNotebookGuid(guid);
NoteList noteList = noteStore.findNotes(getAccessToken(),filter, 0, 100);
for ( Note note: noteList.getNotes() ) {
logger.info(note.getTitle());
}
}


getClient()は前述の通り、SharedIdを元に取得してきます。
それとgetAccessToken()も認証の情報を元に取得してきます。

まずlistNotebooks()によりノートブックの一覧が取得できます。
Notebookには「guid」が存在し、それが一意の識別子になります。

それを元にNoteFilterを準備して、そこにGuidを設定してfindNotes()を行います。
第3、4引数は、オフセットとMaxの件数です。Maxの件数は、、、すべてってのは出来なさそう、、、

ひとまずこんなところですかね。
一応アプリではNotebookの一覧を表示して、クリックしたら、Noteの一覧が出るようなものを考えています。

次はNotebookについて記述していきましょう。

2011年6月4日土曜日

Evernoteにアクセスする その5 OAuth理解編


OAuthサンプルによって解説しようと思っていましたが、
結局暗号化を行って、テスト書いて、色々分かりやすくコードをいじってってこの状態になりました。
以下のコードでアクセスできます。


package jp.co.ziro.evernote.controller;

import java.io.BufferedReader;
import java.io.IOException;
import java.io.InputStreamReader;
import java.io.UnsupportedEncodingException;
import java.net.HttpURLConnection;
import java.net.MalformedURLException;
import java.net.URL;
import java.net.URLDecoder;
import java.net.URLEncoder;
import java.security.InvalidKeyException;
import java.security.NoSuchAlgorithmException;
import java.util.HashMap;
import java.util.Map;
import java.util.Random;
import java.util.TreeMap;
import java.util.logging.Logger;

import javax.crypto.Mac;
import javax.crypto.spec.SecretKeySpec;

import org.apache.commons.codec.binary.Base64;
import org.slim3.util.ApplicationMessage;

/**
*

* EvernoteへのOAuthアクセスクラス
* - 認証URL作成 setCallbackUrl()
* - アクセストークン取得時はsendRequest(tokenSecret)
* で処理を行います。
*
* 認証Urlの作成
* 1.コンストラクタにより、固定値を設定する
* 2.使用側は setCallbackUrl() にコールバックするUrlを設定する
* 3.createAuthorization() の戻り値が認証Urlを取得
* 4.getTokenSecret(),secretを取得(保存)
*
* 認証Urlにアクセスする
* 認可画面が表示され、そこでの結果がコールバックに渡される
*
* コールバックUrlで行う事
* 1.コンストラクタにより固定値を設定する
* 2.oauth_verifier,oauth_tokenがコールバックに呼ばれるのでそれを
* setToken() setVerifier() で設定
* verifierがnullだったら、認証が行われていない。
* 3.sendRequest()を行う。引数は認証Url時に作成したsecret
* 4.oauth_token にリクエストトークン、edam_shard にAPIアクセス用のIdが渡されます。
*
* これらでthriftのAPIを利用して、Evernoteにアクセスできます。
*
*

* @author secondarykey
*/
public class EvernoteRequest {

@SuppressWarnings("unused")
private static Logger logger = Logger.getLogger(EvernoteRequest.class.getName());

/**
* EverNoteのAPI ConsumerKey
*/
private static final String CONSUMERKEY = ApplicationMessage
.get("evernote.api.key");
/**
* EvernoteのAPI ConsumerSecret
*/
private static final String CONSUMERSECRET = ApplicationMessage
.get("evernote.api.secret");

/**
* アクセスするUrl
*/
private static final String BASEURL = ApplicationMessage
.get("evernote.api.baseUrl");

/**
* リクエストToken取得用のUrl
*/
private static final String requestUrl = BASEURL
+ ApplicationMessage.get("evernote.api.requestTokenUrl");

/**
* 認証のUrl
*/
private static final String authorizationUrlBase = BASEURL + ApplicationMessage.get("evernote.api.oauthUrl");

/**
* 文字コード
*/
private static final String CHARSET = "UTF-8";
/**
* キー作成用のGETメソッド名
*/
private static final String REQUEST_METHOD = "GET";
/**
* OAuth nonces用のランダム値生成
*/
private static final Random random = new Random();


/**
* ベースのURL
* @return リクエストするBaseUrl
*/
public static String getBaseUrl() {
return BASEURL;
}

/**
* リクエストするパラメーター
*/
private Map parameters = new TreeMap();

/**
* TokenSecret
* getTokenSecret()時に空の場合、Exceptionを発生
*/
private String tokenSecret = null;
/**
*

* コンストラクタ
* パラメータ固定値を設定する
*

*/
public EvernoteRequest() {
setParameter("oauth_consumer_key", CONSUMERKEY);
setParameter("oauth_timestamp", getTimestamp());
setParameter("oauth_nonce", Long.toHexString(random.nextLong()));
setParameter("oauth_version", "1.0");
//暗号化を行う
setParameter("oauth_signature_method", "HMAC-SHA1");
}
/**
* タイムスタンプを作成
* @return 現在時刻の秒をString化した値
*/
private String getTimestamp() {
return Long.toString(System.currentTimeMillis() / 1000);
}

/**
* コールバックURLを設定する
* @param callbackUrl コールバックUrl
*/
public void setCallbackUrl(String callbackUrl) {
setParameter("oauth_callback", callbackUrl);
}

/**
* リクエストトークンを設定
* @param requestToken コールバックされたリクエストトークン
*/
public void setToken(String requestToken) {
//それぞれをリクエスターに設定
setParameter( "oauth_token", requestToken);
}

/**
* Verifierの設定
* @param verifier コールバックされたverifier値
*/
public void setVerifier(String verifier) {
setParameter( "oauth_verifier", verifier);
}
/**
* リクエスト時の引数設定
* @param name パラメータ名称
* @param value パラメータの値
*/
private void setParameter(String name, String value) {
parameters.put(name, value);
}

/**
* Encodes this request as a single URL that can be opened.
*/
private String getUrl() {
return requestUrl + "?" + join();
}

/**
* HTTP引数の連結
* @return Url引数にして返す
*/
private String join() {
StringBuilder sb = new StringBuilder();
//開始フラグ
boolean firstParam = true;

//引数数繰り返す
for (Map.Entry parameter : parameters.entrySet()) {
//最初の処理
if (firstParam) {
firstParam = false;
} else {
sb.append('&');
}

//キー値を取得
sb.append(parameter.getKey());
//連結子を設定
sb.append('=');
try {
//値をエンコードして設定
sb.append(URLEncoder.encode(parameter.getValue(), CHARSET));
} catch (UnsupportedEncodingException e) {
throw new RuntimeException("エンコード時の例外", e);
}
}
return sb.toString();
}

/**
* リクエストを行う
* @param
*
* @throws IOException
* if a problem occurs making the request or getting the reply.
*/
public Map sendRequest(String tokenSecret) {
//Signatureを設定
setParameter("oauth_signature", createSignature(tokenSecret));
//アクセスする
HttpURLConnection connection;
try {
connection = (HttpURLConnection) (new URL(getUrl())).openConnection();
} catch (MalformedURLException e) {
throw new RuntimeException("アクセスに対する例外",e);
} catch (IOException e) {
throw new RuntimeException("アクセスに対する例外",e);
}

int responseCode;
String responseMessage;
try {
responseCode = connection.getResponseCode();
responseMessage = connection.getResponseMessage();
} catch (IOException e) {
throw new RuntimeException("結果取得を行う",e);
}
// リクエストが正常じゃない場合
if (responseCode != HttpURLConnection.HTTP_OK) {
throw new RuntimeException("Server returned error code: " + responseCode + " " + responseMessage);
}

return createResponseMap(connection);
}

/**
*

* 暗号化を行う
* 1. メソッド名&アクセスUrl&HTTPの引数の文字列を作成
* 2. secretをTokenと連結してsecretをバイト化
* 3. Secret値を元にSignatureStringを暗号化を行う
* 4. その値をBase64で16進数かする
*

* @param tokenSecret リクエストToken取得時に発行されたSecret
* @return 暗号化したSecret値
*/
private String createSignature(String tokenSecret) {

String encodeUrl = encode(requestUrl);
String encodeJoin = encode(join());
String signatureBaseString = REQUEST_METHOD + "&" + encodeUrl + "&" + encodeJoin;

// 署名対象のテキストを作成
String secret = CONSUMERSECRET + "&";
//TokenSecretが存在する場合
if (tokenSecret != null) {
secret += tokenSecret;
}
byte[] secretyKeyBytes;
try {
secretyKeyBytes = secret.getBytes(CHARSET);
} catch (UnsupportedEncodingException e2) {
throw new RuntimeException("エンコード時の失敗",e2);
}

String hmac = "HmacSHA1";
SecretKeySpec secretKeySpec = new SecretKeySpec(secretyKeyBytes,hmac);
Mac mac;
try {
mac = Mac.getInstance(hmac);
mac.init(secretKeySpec);
} catch (NoSuchAlgorithmException e1) {
throw new RuntimeException("暗号化インスタンス取得失敗",e1);
} catch (InvalidKeyException e1) {
throw new RuntimeException("暗号化インスタンス取得失敗",e1);
}

byte[] data;
try {
data = signatureBaseString.getBytes(CHARSET);
} catch (UnsupportedEncodingException e) {
throw new RuntimeException(CHARSET + " is unsupported!", e);
}
byte[] rawHmac = mac.doFinal(data);
Base64 encoder = new Base64();

return new String(encoder.encode(rawHmac));
}

/**
* 値のUrlエンコード
* @param value エンコードする値
* @return エンコードした値
*/
private String encode(String value) {
String rtnData;
try {
rtnData = URLEncoder.encode(value,CHARSET);
} catch (UnsupportedEncodingException e) {
throw new RuntimeException("エンコード時の例外",e);
}
return rtnData;
}
/**
* レスポンスの値を取得
*
* @param connection
* @return
*/
private Map createResponseMap(HttpURLConnection connection) {

BufferedReader bufferedReader;
String result;
try {
bufferedReader = new BufferedReader(new InputStreamReader(
connection.getInputStream()));
result = bufferedReader.readLine();
} catch (IOException e) {
throw new RuntimeException("読み込み時の例外", e);
}

Map responseParameters = new HashMap();
for (String param : result.split("&")) {
int equalsAt = param.indexOf('=');
if (equalsAt > 0) {
String name = param.substring(0, equalsAt);
String value;
try {
value = URLDecoder.decode(param.substring(equalsAt + 1),
CHARSET);
} catch (UnsupportedEncodingException e) {
throw new RuntimeException("エンコード時の例外", e);
}
responseParameters.put(name, value);
}
}
return responseParameters;
}

/**
* 認証Urlの作成
* @return
*/
public String createAuthorizarionUrl() {
//リクエスト
Map reply = sendRequest(null);
String requestToken = reply.get("oauth_token");
//認証Urlの作成
String authorizationUrl = authorizationUrlBase + "?oauth_token=" + requestToken;
//TokenSecretを設定する
tokenSecret = reply.get("oauth_token_secret");
return authorizationUrl;
}

/**
* TokenSecretの取得
* @return
*/
public String getTokenSecret() {
if ( tokenSecret == null ) {
throw new NullPointerException("TokenSecretが設定されていない");
}
return tokenSecret;
}


}


まずコンストラクタで各種固定値の設定を行います。


  • oauth_consumer_key:KEY値

  • oauth_signature_method:「PLANTEXT」「HMAC-SHA1」のどちらか

  • oauth_timestamp:現在の秒

  • oauth_nonce:ランダムの値(リクエスト毎に一意)

  • oauth_version:「1.0」固定


Evernoteのサンプルではoauth_signatureにSECRET値を指定していますが、
HMAC-SHA1の際は暗号化を行うので、まだ指定していません。
oauth_signature_methodはPLANTEXT、HMAC-SHA1が存在し、サンプルはPLANTEXTが指定されています。
PLANTEXTを推奨(つうか使って)しているのも珍しい気もします。

HTTPにアクセスする時に利用するMapをTreeMapを利用していますが
暗号化時に引数をソートする必要があるのでTreeMapでKey値のソートを行っているわけです。

コンストラクタで設定した後はコールバックUrl(oauth_callback)を指定します。
Evernoteの認可画面により処理が行われるとそのUrlに戻ってきます。

認可画面に行くためにリクエストトークンを取得しに行きます。
createAuthorizarionUrl()ですね。

ここでsendRequest()でEvernoteにアクセスしています。
oauth_signatureをcreateSignatuer()を行ってHMAC-SHA1の暗号化を行って指定しています。

返ってきたResponseから値を取得します。
レスポンスにリクエストトークン(oauth_token)とSecret(oauth_token_secret)が指定されています。
リクエストトークンはhttps://sandbox.evernote.com/?oauth_token=xxxxとして利用すると認可画面にアクセスする事ができます。
Secret値は、アクセストークン時にシグネチャ値のキー値とする時にConsumerSecretと合わせて使用します。

ここまでが認可画面のリンクを作成する流れです。

コールバックURLを指定していますが、認可画面にアクセスし、操作を行うとこのUrlに戻ってきます。
そちらの処理が以下になります。

認証に成功するとコールバックURLにoauth_token、oauth_verifierが付与されて来ます。
oauth_verifierが存在しない場合は認証で拒否された等ですので、エラー画面等を出力しましょう。

設定されていたら、アクセストークンを取得する為、
このクラスをnewしてインスタンス化します。※設定する値は一緒。

oauth_tokenをsetToken() ,oauth_verifierをsetVerifier()を利用して、設定します。
設定したらsendRequest()によりアクセストークンを取得するのですが、
この時に最初のアクセスで取得したtokenSecretを渡します。

取得に成功するとoauth_tokenにアクセストークン、edam_shardにEvernoteにアクセスする時に必要な値が入ってきます。
このアクセストークンさえあれば何でもできるわけです。


その値を利用してAPIのアクセスです。
thriftのライブラリを使っています。


String noteStoreUrl = noteStoreUrlBase + shardId;
THttpClient noteStoreTrans = new THttpClient(noteStoreUrl);
TBinaryProtocol noteStoreProt = new TBinaryProtocol(noteStoreTrans);

NoteStore.Client noteStore =
new NoteStore.Client(noteStoreProt, noteStoreProt);
List notebooks = noteStore.listNotebooks(accessToken);
for (Notebook notebook : notebooks) {
logger.info("Notebook: " + notebook.getName());
}


サンドボックス+"/edam/note/"+edam_shardの値を作成して
それでTHttpClientを生成、それを利用してTBinaryProtocolを生成しています。

それを利用して生成しているNoteStore.ClientはEvernoteのライブラリですね。
生成したオブジェクトでAPI呼び出しを行っています。
ここではlistNotebooks()です。そこにアクセストークンを渡してアクセスしています。


・・・さて、再度理解を深める為にOAuthをしっかり説明してみました。
説明がヘタすぎますけど、ご了承ください。

まぁとにかく次回はAPIで色々やってみます。

2011年6月3日金曜日

Evernoteにアクセスする その4 HMAC-SHA1編


ここまでサンプルを元にEvernoteにアクセスしてきましたが、
SimpleOAuthRequestの中身を見てOAuthアクセスへの理解を
深めておきましょう。。。。って思ったんですけど、PLANTEXTでアクセスしているので
HMAC-SHA1でアクセスしてみましょう。

以下が元ソースです。
見られる場合は展開してください。


/**
* Copyright 2008 by EverNote Corporation. All rights reserved.
*/

package com.evernote.oauth.consumer;

import java.io.BufferedReader;
import java.io.IOException;
import java.io.InputStreamReader;
import java.net.HttpURLConnection;
import java.net.URL;
import java.net.URLDecoder;
import java.net.URLEncoder;
import java.util.HashMap;
import java.util.Map;
import java.util.Random;

/**
* This is a very simple implementation of an OAuth consumer request which can
* be used to ask an OAuth service provider for either a Request Token or
* an Access Token. It only handles PLAINTEXT authentication, and it only goes
* over a GET transport. As a result, it should only be used over SSL.
*
* @author Dave Engberg
*/
public class SimpleOAuthRequest {

/**
* Random number generator for creating OAuth nonces
*/
private static final Random random = new Random();

/**
* The URL of the OAuth service Provider that we should hit to request a
* token.
*/
private String providerUrl;

/**
* A mapping containing all of the OAuth parameters that will be passed in
* the reply.
*/
private Map parameters = new HashMap();

/**
* Constructs a request object that can be used to make token requests from
* an OAuth provider.
*
* @param providerUrl the base URL to request a Request or Access token
* @param consumerKey the OAuth consumer key, given by the Service Provider
* @param consumerSecret the OAuth consumer secret, given by the Provider
* @param tokenSecret if non-null, this is the previous oauth_token_secret
* that should be used in signing this request. If null, this will assume
* that this message does not include a token secret in its signature
*/
public SimpleOAuthRequest(String providerUrl, String consumerKey,
String consumerSecret, String tokenSecret) {
this.providerUrl = providerUrl;
setParameter("oauth_consumer_key", consumerKey);
String signature = consumerSecret + "&";
if (tokenSecret != null) {
signature += tokenSecret;
}
setParameter("oauth_signature", signature);
setParameter("oauth_signature_method", "PLAINTEXT");
setParameter("oauth_timestamp",
Long.toString(System.currentTimeMillis() / 1000));
setParameter("oauth_nonce",
Long.toHexString(random.nextLong()));
setParameter("oauth_version", "1.0");
}

/**
* Sets one of the query string parameters for the request that will be
* made to the OAuth provider. The value will be URL encoded before adding
* to the URL.
*
* @param name the name of the parameter to be set
* @param value the string value, unencoded
*/
public void setParameter(String name, String value) {
parameters.put(name, value);
}

/**
* Encodes this request as a single URL that can be opened.
*/
public String encode() throws IOException {
StringBuilder sb = new StringBuilder();
sb.append(providerUrl);
boolean firstParam = providerUrl.indexOf('?') < 0;
for (Map.Entry parameter : parameters.entrySet()) {
if (firstParam) {
sb.append('?');
firstParam = false;
} else {
sb.append('&');
}
sb.append(parameter.getKey());
sb.append('=');
sb.append(URLEncoder.encode(parameter.getValue(), "UTF-8"));
}
return sb.toString();
}

/**
* Sends the request to the OAuth Provider, and returns the set of reply
* parameters, mapped from name to decoded value.
*
* @throws IOException if a problem occurs making the request or getting the
* reply.
*/
public Map sendRequest() throws IOException {

HttpURLConnection connection =
(HttpURLConnection)(new URL(encode())).openConnection();
int responseCode = connection.getResponseCode();
if (responseCode != HttpURLConnection.HTTP_OK) {
throw new IOException("Server returned error code: " + responseCode +
" " + connection.getResponseMessage());
}
BufferedReader bufferedReader = new BufferedReader(
new InputStreamReader(connection.getInputStream()));
String result = bufferedReader.readLine();
Map responseParameters = new HashMap();
for (String param : result.split("&")) {
int equalsAt = param.indexOf('=');
if (equalsAt > 0) {
String name = param.substring(0, equalsAt);
String value =
URLDecoder.decode(param.substring(equalsAt + 1), "UTF-8");
responseParameters.put(name, value);
}
}
return responseParameters;
}

}


これをHMAC-SHA1で処理を行う場合は、oauth_signatureの指定に
・HTTPメソッド
・リクエストURL
・リクエストパタメータ
これらをURLエンコードして、&で結合してHMAC-SHA1で16進のダイジェスト値を作って
Base64エンコード後、URLエンコードした値をoauth_signatureに指定します。

オリジナルでEvernoteRequestクラスを作成してアクセスしてみましょう。
※動作確認用なので汚いのは許して><

以下がHMAC-SHA1でアクセスしたソース


/**
* Copyright 2008 by EverNote Corporation. All rights reserved.
*/

package jp.co.ziro.evernote.controller;

import java.io.BufferedReader;
import java.io.IOException;
import java.io.InputStreamReader;
import java.io.UnsupportedEncodingException;
import java.net.HttpURLConnection;
import java.net.URL;
import java.net.URLDecoder;
import java.net.URLEncoder;
import java.security.InvalidKeyException;
import java.security.NoSuchAlgorithmException;
import java.util.HashMap;
import java.util.Map;
import java.util.Random;
import java.util.TreeMap;
import java.util.logging.Logger;

import javax.crypto.Mac;
import javax.crypto.spec.SecretKeySpec;

import org.apache.commons.codec.binary.Base64;
import org.slim3.util.ApplicationMessage;

/**
* This is a very simple implementation of an OAuth consumer request which can
* be used to ask an OAuth service provider for either a Request Token or an
* Access Token. It only handles PLAINTEXT authentication, and it only goes over
* a GET transport. As a result, it should only be used over SSL.
*
* @author Dave Engberg
*/
public class EvernoteRequest {

@SuppressWarnings("unused")
private static Logger logger = Logger.getLogger(EvernoteRequest.class.getName());
private static final String consumerKey = ApplicationMessage
.get("evernote.api.key");
private static final String consumerSecret = ApplicationMessage
.get("evernote.api.secret");
private static final String urlBase = ApplicationMessage
.get("evernote.api.baseUrl");
private static final String requestUrl = urlBase
+ ApplicationMessage.get("evernote.api.requestTokenUrl");
/**
* ベースのURL
* @return
*/
public static String getBaseUrl() {
return urlBase;
}

/**
* Random number generator for creating OAuth nonces
*/
private static final Random random = new Random();

/**
* A mapping containing all of the OAuth parameters that will be passed in
* the reply.
*/
private Map parameters = new TreeMap();

/**
* Constructs a request object that can be used to make token requests from
* an OAuth provider.
*/
public EvernoteRequest() {
setParameter("oauth_consumer_key", consumerKey);
//暗号化を行う
setParameter("oauth_signature_method", "HMAC-SHA1");
setParameter("oauth_timestamp", getTimestamp());
setParameter("oauth_nonce", Long.toHexString(random.nextLong()));
setParameter("oauth_version", "1.0");
}
/**
* タイムスタンプを作成
* @return
*/
private String getTimestamp() {
return Long.toString(System.currentTimeMillis() / 1000);
}

/**
* Sets one of the query string parameters for the request that will be made
* to the OAuth provider. The value will be URL encoded before adding to the
* URL.
*
* @param name
* the name of the parameter to be set
* @param value
* the string value, unencoded
*/
public void setParameter(String name, String value) {
parameters.put(name, value);
}

/**
* Encodes this request as a single URL that can be opened.
*/
private String encode() {
return requestUrl + "?" + join();
}

/**
* HTTP引数の連結
* @return
*/
private String join() {
StringBuilder sb = new StringBuilder();
boolean firstParam = true;
for (Map.Entry parameter : parameters.entrySet()) {
if (firstParam) {
firstParam = false;
} else {
sb.append('&');
}
sb.append(parameter.getKey());
sb.append('=');
try {
sb.append(URLEncoder.encode(parameter.getValue(), CHARSET));
} catch (UnsupportedEncodingException e) {
throw new RuntimeException("エンコード時の例外", e);
}
}
return sb.toString();
}

/**
* 文字コード
*/
private static final String CHARSET = "UTF-8";
/**
* キー作成用のGETメソッド名
*/
private static final String REQUEST_METHOD = "GET";

/**
* Sends the request to the OAuth Provider, and returns the set of reply
* parameters, mapped from name to decoded value.
*
* @throws IOException
* if a problem occurs making the request or getting the reply.
*/
public Map sendRequest(String tokenSecret) throws IOException {
// 署名対象のテキストを作成
String secret = consumerSecret + "&";
if (tokenSecret != null) {
secret += tokenSecret;
}

String hmac = "HmacSHA1";

String encodeUrl = URLEncoder.encode(requestUrl,CHARSET);
String encodeJoin = URLEncoder.encode(join(),CHARSET);

String signatureBaseString = REQUEST_METHOD + "&" + encodeUrl + "&" + encodeJoin;
logger.info(signatureBaseString);

byte[] secretyKeyBytes = secret.getBytes(CHARSET);
SecretKeySpec secretKeySpec = new SecretKeySpec(secretyKeyBytes,hmac);
Mac mac;
try {
mac = Mac.getInstance(hmac);
mac.init(secretKeySpec);
} catch (NoSuchAlgorithmException e1) {
throw new RuntimeException("暗号化インスタンス取得失敗",e1);
} catch (InvalidKeyException e1) {
throw new RuntimeException("暗号化インスタンス取得失敗",e1);
}

String signature = null;
byte[] data;
byte[] rawHmac;
try {
data = signatureBaseString.getBytes(CHARSET);
rawHmac = mac.doFinal(data);
Base64 encoder = new Base64();
signature = new String(encoder.encode(rawHmac));
} catch (UnsupportedEncodingException e) {
throw new RuntimeException(CHARSET + " is unsupported!", e);
}
setParameter("oauth_signature", signature);

HttpURLConnection connection = (HttpURLConnection) (new URL(encode())).openConnection();
int responseCode = connection.getResponseCode();
// リクエストが正常じゃない場合
if (responseCode != HttpURLConnection.HTTP_OK) {
throw new IOException("Server returned error code: " + responseCode
+ " " + connection.getResponseMessage());
}
return createResponseMap(connection);
}

/**
* レスポンスの値を取得
*
* @param connection
* @return
*/
private Map createResponseMap(HttpURLConnection connection) {

BufferedReader bufferedReader;
String result;
try {
bufferedReader = new BufferedReader(new InputStreamReader(
connection.getInputStream()));
result = bufferedReader.readLine();
} catch (IOException e) {
throw new RuntimeException("読み込み時の例外", e);
}

Map responseParameters = new HashMap();
for (String param : result.split("&")) {
int equalsAt = param.indexOf('=');
if (equalsAt > 0) {
String name = param.substring(0, equalsAt);
String value;
try {
value = URLDecoder.decode(param.substring(equalsAt + 1),
CHARSET);
} catch (UnsupportedEncodingException e) {
throw new RuntimeException("エンコード時の例外", e);
}
responseParameters.put(name, value);
}
}
return responseParameters;
}
}


・・・本当に汚い、、、
で、これを利用してindex時に


EvernoteRequest oauthRequestor = new EvernoteRequest();
String thisUrl = request.getRequestURL().toString();
String cbUrl = thisUrl.substring(0, thisUrl.lastIndexOf('/') + 1);
cbUrl = cbUrl + "callback";

oauthRequestor.setParameter("oauth_callback", cbUrl);
Map reply = oauthRequestor.sendRequest(null);

String requestToken = reply.get("oauth_token");
String tokenSecret = reply.get("oauth_token_secret");
String authorizationUrl = authorizationUrlBase + "?oauth_token=" + requestToken;

sessionScope("tokenSecret",tokenSecret);


という風にします。
すべての引数を指定した後にoauth_signatureを生成するので
sendRequest()にtokenSecretを持ってきています。(コールバック時に利用)

リクエストトークンとともにtokenSecretは取得できます。
アクセストークンを取得する際に使用するtokenSecretをセッションに残しています。
で以下がコールバックの処理。


EvernoteRequest oauthRequestor = new EvernoteRequest();

String requestToken = requestScope("oauth_token");
String verifier = requestScope("oauth_verifier");
String tokenSecret = sessionScope("tokenSecret");

oauthRequestor.setParameter( "oauth_token", requestToken);
oauthRequestor.setParameter( "oauth_verifier", verifier);

//取得する
Map reply = oauthRequestor.sendRequest(tokenSecret);


こちらはセッションからtokenSecretを取得して指定しているだけですね。

んーAuthrorization Headerでアクセスしたいですよねー。
アクセスもPOSTでもないですし。。。本物はそうしてみようっ。と。

次回、OAuthを読んでいくか、APIアクセスをもう少し行ってみるか悩んでます。
それを記述するのはOAuthの仕様なだけなのでそっち読めば良いかなぁ、、、と。

Evernoteにアクセスする その3 サンプルをシンプル編


サンプルはJSPでOAuthを分かりやすく記述していますが
手数が多く記述してあるので、実装としてはわかりずらいので
一旦整理してみましょう。

Google for Eclipse Plugin[更新サイト:http://dl.google.com/eclipse/plugin/3.6] と
Slim3 Plugin[更新サイト:http://slim3.googlecode.com/svn/updates/]をインストールします。

Slim3はGoogleAppEngineに最適化されたMVCフレームワークです。
非常に簡単なので説明は省きます。

indexを作成して


SimpleOAuthRequest oauthRequestor =
new SimpleOAuthRequest(requestTokenUrl,consumerKey,consumerSecret,null);

//現在のURLからコールバックURLを作成
String thisUrl = request.getRequestURL().toString();
String cbUrl = thisUrl.substring(0, thisUrl.lastIndexOf('/') + 1);
cbUrl = cbUrl + "callback";

oauthRequestor.setParameter("oauth_callback", cbUrl);
Map reply = oauthRequestor.sendRequest();

String requestToken = reply.get("oauth_token");
String authorizationUrl = authorizationUrlBase + "?oauth_token=" + requestToken;

//認証にリダイレクトを行う
return redirect(authorizationUrl);


設定値などはコールバックURL以外はそのままです。
SimpleOAuthRequestを利用して認証用のURLを作成してそのままリダイレクトをかけてます。
※もちろんログインボタンとか作りたいなら別ですけど。

これにより/indexにアクセスするとEvernoteの認可画面が表示されるはずです。
それではコールバックURLを指定してみましょう。
callbackを作成して


SimpleOAuthRequest oauthRequestor = new SimpleOAuthRequest( requestTokenUrl, consumerKey, consumerSecret, null);

String requestToken = requestScope("oauth_token");
String verifier = requestScope("oauth_verifier");
oauthRequestor.setParameter( "oauth_token", requestToken);
oauthRequestor.setParameter( "oauth_verifier", verifier);

Map reply = oauthRequestor.sendRequest();

String accessToken = reply.get("oauth_token");
String shardId = reply.get("edam_shard");
String noteStoreUrl = noteStoreUrlBase + shardId;

THttpClient noteStoreTrans = new THttpClient(noteStoreUrl);
TBinaryProtocol noteStoreProt = new TBinaryProtocol(noteStoreTrans);
NoteStore.Client noteStore =
new NoteStore.Client(noteStoreProt, noteStoreProt);

List notebooks = noteStore.listNotebooks(accessToken);
for (Notebook notebook : notebooks) {
logger.info("Notebook: " + notebook.getName());
}


これもサンプルと同じ実装ですね。
もちろん認証してなかったら~とかの処理は必要ですが、
何やっているかを分かりやすくするため、2つのURLだけで実装してみました。

ListのところはNotebookを返してたので?じゃなくしました。
THttpClient はライブラリに存在するthriftのAPIですね。
それらを利用してEvernoteのAPIを利用するイメージです。

SimpleOAuthRequestの実装を説明しないと何やってるかわかりずらいですね。
次回はSimpleOAuthRequestについて記述してみましょう。

2011年6月2日木曜日

Evernoteにアクセスする その2 OAuthアクセス編


前回サンプルを動作させてみました。
サンプルはOAuthの動作を見せる感じに作ってあります。
JSPに書かれていて処理がわかりずらいのでコードを解析しながら読みやすくしていきましょう。

最初の方は定数等を定義していますね。

private enum supportedRedirSchemas {FULL, EMBED};


は、iframeを利用する場合の処理の分岐ですね。
少し分かりづらいですが、基本的にindex.jspに対して、
「action」という引数を渡して処理を行ってます。


  1. getRequestTokenの処理

  2. Evernoteにアクセス(引数なし)

  3. 認証後getAccessTokenの処理

  4. AccessTokenによりlistNotebooks


という順序で処理を行っています。
これはRequestTokenを準備してEvernoteにアクセスして
認証結果をAccessTokenで取得。
最後にAPIにアクセスしている感じです。

まぁご存知「OAuth1.0」アクセスです。
まずはgetRequestTokenによるrequestTokenの取得です。

サンプルのはじめのリンクをクリックした時の処理


SimpleOAuthRequest oauthRequestor =
new SimpleOAuthRequest(requestTokenUrl, consumerKey, consumerSecret, null);

// Set the callback URL
String thisUrl = request.getRequestURL().toString();
 String cbUrl = thisUrl.substring(0, thisUrl.lastIndexOf('/') + 1);
 if (redirSchema != null && redirSchema.equals(supportedRedirSchemas.EMBED.toString())) {
  cbUrl = cbUrl + callbackEmbedUrl;
 } else {
  cbUrl = cbUrl + callbackUrl;
 }
 oauthRequestor.setParameter("oauth_callback", cbUrl);

out.println("Request: " + oauthRequestor.encode());
Map reply = oauthRequestor.sendRequest();
out.println("Reply: " + reply);
requestToken = reply.get("oauth_token");
session.setAttribute("requestToken", requestToken);


ここで大事なのは
 com.evernote.oauth.consumer.SimpleOAuthRequest
クラスです。

コンストラクタではリクエストする為の引数を作っています。
その後、iframe埋め込みかを判定して、戻ってくるURLを変更しています。
サンプルを動作させるとわかりますがEMBEDを選んだ場合はiframeが出現して、
callback.jspが表示され、そのiframe上で認証をかけます。
なのでまぁその辺はあまり関係ないです。(OAuth後に呼び出すURLを変更するだけ)

sendRequest()によりrequestTokenUrlにリクエストして、RequestTokenを取得しにいっています。
戻り値のマップはResponseの値です。


その下で取得したRequestTokenでURLを作成しています。


String authorizationUrl = authorizationUrlBase + "?oauth_token=" + requestToken;
if (redirSchema != null && redirSchema.equals(supportedRedirSchemas.EMBED.toString())) {
authorizationUrl = authorizationUrl + "&format=microclip";
}


埋め込みの場合は少しいじってますね。
このURL(Evernote)にアクセスする事で認可できるわけです。
このURLが2番目のURL。

JSPでまどろっこしいのですが、
基本的にはURL生成からリダイレクトすればいきなり認証も可能ですね。

そのURLにアクセスすれば


という風にEvernoteへの認可画面(認証済なのでこういう画面ですが認証してないとログイン画面)が出ます。

これに認可されると指定してあるCallbackUrlに処理がきます。

コールバックで戻ってくる最初の処理がこちら。


requestToken = request.getParameter("oauth_token");
verifier = request.getParameter("oauth_verifier");
session.setAttribute("verifier", verifier);


ちなみに「oauth_verifier」がnullの時は認可がされなかった時になります。
とにかくセッションに貯めてますね。。。このサンプル。
実際使う場合はコールバックURLでRequestTokenもverifierも取得して判定すれば良いでしょう。

で3番目のリンクをクリックすると


// Send an OAuth message to the Provider asking to exchange the
// existing Request Token for an Access Token
SimpleOAuthRequest oauthRequestor =
new SimpleOAuthRequest(requestTokenUrl, consumerKey, consumerSecret, null);
oauthRequestor.setParameter("oauth_token",
(String)session.getAttribute("requestToken"));
oauthRequestor.setParameter("oauth_verifier",
(String)session.getAttribute("verifier"));
out.println("Request: " + oauthRequestor.encode());
Map reply = oauthRequestor.sendRequest();
out.println("Reply: " + reply);
accessToken = reply.get("oauth_token");
String shardId = reply.get("edam_shard");
session.setAttribute("accessToken", accessToken);
session.setAttribute("shardId", shardId);


この処理を行っています。
再度SimpleOAuthRequestを利用してアクセストークンを取得しています。
・・・まぁセッションにまた貯めてますねぇ。。。

で最後にAPIにアクセスしています。


String noteStoreUrl = noteStoreUrlBase +
session.getAttribute("shardId");

out.println("Listing notebooks from: " + noteStoreUrl);
THttpClient noteStoreTrans = new THttpClient(noteStoreUrl);
TBinaryProtocol noteStoreProt = new TBinaryProtocol(noteStoreTrans);
NoteStore.Client noteStore =
new NoteStore.Client(noteStoreProt, noteStoreProt);
List notebooks = noteStore.listNotebooks(accessToken);

for (Object notebook : notebooks) {
out.println("Notebook: " + ((Notebook)notebook).getName());
}


これによりノートブック一覧が取得できます。
ひとまずOAuthアクセスはこんな感じでできます。

SimpleOAuthRequestを読んでもらえればわかりますが、
パラメータを設定してアクセスしてあげてくれるだけです。

なのでOAuthの仕組みさえわかっていれば簡単です。
※サンプルは流れさえ押さえれば、わかるのですが
 JSPだけでアクセスしてるのでかなり複雑な書き方になっています。

OAuth1.0の解説で一番わかりやすいのはゆろよろ氏が記述している
OAuthプロトコルの中身をざっくり解説してみるよだと思います。
ご覧になってください。


さて今回はサンプルを元にやりましたので
次回Slim3を使ってアクセスしてみましょう!

2011年6月1日水曜日

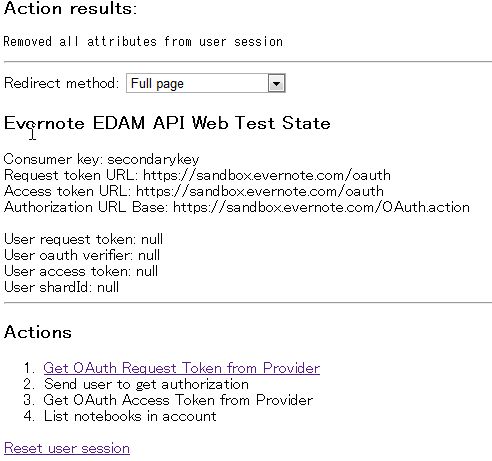
Evernoteにアクセスする その1 サンプル動作編


少し前にメモアプリを考えていて、
appengineに保存しようと思っていたんですけど、
なんとなくevernoteに残そうと思い立ったのでアクセスしてみた。

まず「http://www.evernote.com/」にアクセスすると
サイト下部に「開発者の方へ」とあるのでそこをクリック。


「WebサービスAPI」の説明があるのでそこを読んでクリック


そこで入力フォームがあるので、各種入力してSUBMITを行います。


そこから3日程待ちます。。。(´・ω・`)
※サンプル動かしてみてわかったのですが、
Webとして申込むとクライアントアプリのアクセスはできません。
おそらくクライアントアプリでWebのAPIアクセスは無理です。


すると英文でKeyとSecretが送られてきます。
一応これはsandboxなので終わったらできあがったよーってメール送ると
本番環境でも使えるようになるみたいです。(それは後日書くかな。。。)


さて開発に入ります。
・・・その前にユーザをsandnox側で登録しておく必要があります。


まずは
http://www.evernote.com/about/developer/api/
からサンプル等の入ったZIPをダウンロードしてきます。


まずダウンロードしたファイルを解凍します。
\evernote-api-1.19\sample\java\oauth\src
がソースになります。(warもあるのでそれでもOK)

java側にはOAuth用(com.evernote.oauth.consumer.SimpleOAuthRequest)のソースが存在します。
webappにはWebアプリ用のソースが存在します。

ライブラリには

log4j-1.2.14.jar
libthrift.jar
evernote-api-1.19.jar

を使ってますね。


展開したinde.jspの20行目位に

static final String consumerKey = "xxxxxxx";
static final String consumerSecret = "xxxxxxxx";

というコードがあるのでそこをメールできたKEYとSECRETに変更する。
これでAPIにアクセス可能になります。

これで動作できるようになります。


。。。サンプルが汚かったのでちょっとまだ読んでないで動作確認のみです。
ソース読みながらOAuthのアクセス(他と一緒の感じですけど)と
API等を見ながらアクセスしてみようと思います。